How to Read a Power Supply Label
Overview
Ability supply is a reference to the source of electrical power. Most electronic circuits require a DC power supply. Chances are you lot accept i at home already, and tin use it for concrete computing projects.
The nigh common operating voltages for microcontrollers and digital processors are 5V and iii.3V. You can find power supplies in many voltages, but 5V and 12V are common. To catechumen 12V to 5V or 3.3V, you'd need a voltage regulator. The Breadboard Lab covers how to ready that up.
There are many dissimilar kinds of DC power supplies but this one shown in Figure 1 is most usually used at ITP:
– Click on any epitome for a larger view
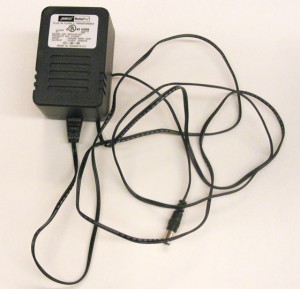
Jameco 12V Regulated Switching Power Supply
Part# 170245 (12V, 1000mA)
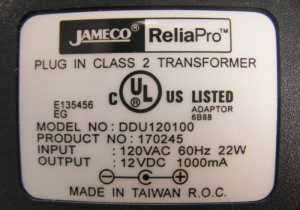
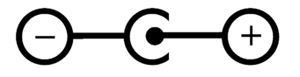
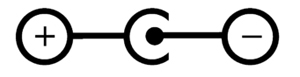
Almost power supplies have a rating characterization that looks something similar the one in Effigy 2. Make certain yous know the polarity of the plug so you don't contrary polarity for your circuit and impairment your components. The diagram in Effigy 3 and Figure 4 showing positive tip polarity is on the left and negative tip polarity is on the correct. The eye positive drawing on the left indicates that the center (tip) of the output plug is positive (+) and the barrel of the output plug is negative (-).
,
Abbreviations
V : Volts
A : Amperes
Due west : Watts
mA : miliAmperes
VA : Volt Amperes
VAC : Volts Air-conditioning
VDC : Volts DC
DC : Directly Current
AC : Alternate Electric current
Testing your power supply
Information technology is always good practice to examination a ability supply before using it for the first time. The example below volition prove how to test a ability supply with positive polarity. If you accept a negative polarity power supply, then y'all will go a negative reading. Y'all should and then switch the position of the multimeter probes.
Blackness probe touches the barrel
- Plug your power supply into an AC outlet.
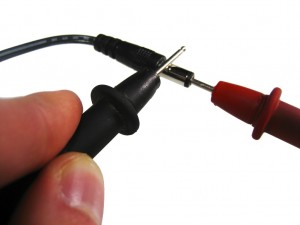
- Crimson probe goes into the tip
Black probe touches the butt as shown in Effigy 5. - Turn on your multimeter and set it to read DC voltage.
- Accept the ruby (positive) probe from your multimeter and stick information technology into the end of the power supply plug.
- Take the black (negative) probe from your multimeter and carefully impact it against the barrel of the plug without touching the tip or your red probe. If you make a connexion, you will be creating a short circuit.
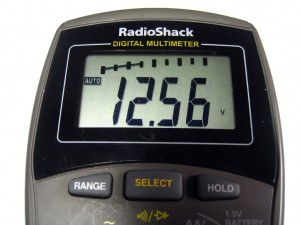
- On your multimeter you should meet a reading of the voltage coming from your power supply. If yous are checking a 12V power supply and your multimeter shows "12.56V" everything is fine and dandy equally shown in Figure half-dozen. If you become a reading of "-12.56V" then your probes are attached in reverse. If this happens and y'all are positive you connected your probes correctly, double check the polarity on your ability supply's characterization and make certain the circuit y'all will be powering with this unit of measurement is designed to handle this polarity.
If the voltage showing on your multimeter is more than half a volt or a volt off its rating, then you most likely take what is called anunregulated ability supply. The 12V Jameco power supply nosotros used in this example is a regulated one, so that is why the voltage nosotros received was so close to the voltage it was rated for.
Powering an Arduino Project from a Mobile Phone Charger
Many people have old mobile phone chargers around the business firm, and wonder, "Can I use this for powering an Arduino projection?" More often than not, y'all tin can. Just get a USB cable with the appropriate connectors to connect the phone charger to your Arduino. Most phone chargers output 5V and a few hundred milliamps, which will power an Arduino, some sensors, and some LEDs.
Matching A Power Supply to an Electronics Device
To determine whether a ability supply is correct for your project, y'all need to annotation the voltages that each component operates at, and the electric current they consume, and make sure your power supply tin can provide the right amount of power.
Here are a few examples:
Imagine you lot're making a project that includes an Arduino, a few LEDs, some pushbuttons, some potentiometers or other variable resistors, and mayhap a speaker. The Digital In and Out lab and the Analog In lab, and the Tone Output labs all describe projects that come across this description. All of the components other than the Arduino in this project are powered from the Arduino voltage output. None of the external components eat more than a few milliamps each. The whole circuit, Arduino included, will likely eat less than 200 milliamps of current. Here's a breakdown, measured using an LED and a potentiometer:
- Arduino Uno, no external components: 0.04A (40 mA)
- Arduino Nano 33 IoT, no external components: 0.01A (10 mA)
- LED: iv mA
- potentiometer connected as analog input: 0.29 mA
- 8-ohm speaker, playing a tone on the output pin: 0.v mA
A phone charger, which supplies 5 volts and most 500 milliamps to the Arduino, would do the job fine. The Arduino Uno operates on 5 volts, and the Arduino Nano 33 IoT, which operates at three.3 volts, has a built-in voltage regulator that volition catechumen the 5V to 3.3V.
If you lot had a 12-volt supply like the ane above, you could also utilise it for these projects. The Arduino Uno has a voltage in plug which matches it, and tin can take upwards to 15V. An on-board regulator converts the higher voltage input to 5V. The Nano 33 IoT has an on-board regulator that can accept up to 20V in its Vin pin (physical pivot fifteen), so if you continued a DC ability Jack and continued the ground of the 12-volt supply to the Arduino's basis and the positive connection of the 12-volt supply to the Arduino'south Vin pin, your project would operate.
Arduino, Servomotor
If you're controlling an RD servomotor from an Arduino as shown in the Servomotor lab, yous demand to consider the current a bit more than. A servo like the Hitec HS-311 , which is pop in physical computing projects, operates at four.8 – 6.0V, so it tin can become enough voltage from an Arduino's voltage output. When it's idle, it consumes almost 160 mA with no load on information technology. Information technology tin can consume upwards to 3-400 mA with a heavy load, still. It'south wise to plan your project for each component's maximum current consumption, so a unmarried servo and Arduino could eat up to 440 – 450 milliamps at 5 volts. That is nearly the limit of what a laptop estimator can supply via USB, and it'due south the limit of some smaller phone chargers also. If you were controlling multiple servos, you lot wouldn't have enough current.
- Arduino Uno, no external components: 0.04A (40 mA)
- Arduino Nano 33 IoT, no external components: 0.01A (10 mA)
- HS-311, heavy load: 400 mA
Arduino, DC Motor or Lights
When you showtime powering larger DC motors, DC lights, or other high-current loads, yous take to calculate the voltage and current earlier you select a power supply. You generally work from the component that has the highest consumption and work from there.
For example, controlling an LED light bulb like this i would crave a 12V DC ability supply for the bulb. It consumes 11 watts of power, and watts = volts * amps, so information technology consumes virtually 917 milliamps of current at 12 volts. The transistor and Arduino that might command it could be powered via the same 12-volt power supply, and would consume the aforementioned amounts as in the examples higher up.
Motor projects and addressable LED projects often consume the most electrical energy and are the most complex to power. A typical addressable LED like a WS2812, aka NeoPixel LED, consumes betwixt 60 and 80 mA of current at v volts. When yous have a cord of 60 of them, that's 3.vi amps of electric current! These definitely can't be powered from a typical DC wall supply. When you reach that level of complexity with a project, consult your components' datasheets or your instructors for more guidance. The videos on electricity, current, and ability are helpful on this subject as well.
Source: https://itp.nyu.edu/physcomp/lessons/electronics/understanding-dc-power-supplies/
0 Response to "How to Read a Power Supply Label"
Post a Comment